Setup CI/CD Pipeline — Workload Identity Federation & GitHub Secrets
In this section you will establish a secure, keyless connection between your GCP project and GitHub using Workload Identity Federation, then configure the GitHub Actions secrets that power the automated deployment pipeline.
What is Workload Identity Federation?
Workload Identity Federation is a secure method for granting external identities (like GitHub Actions) temporary access to Google Cloud resources without using long-lived service account keys. It works by having Google Cloud trust an external identity provider (GitHub) and map the external identity's token to a specific GCP Service Account. This eliminates the security risk of storing static keys, ensuring a keyless CI/CD pipeline for deploying to Cloud Run.
Before You Start — Gather Your Variables
You need three values from your GCP project. Find them on the GCP Welcome page: https://console.cloud.google.com/welcome
| Variable | Where to find it |
|---|---|
PROJECT_ID |
GCP Welcome page — Project ID field |
PROJECT_NUMBER |
GCP Welcome page — Project number field |
GITHUB_REPO |
[YOUR_USERNAME]/cloud-mastery-ecommerce |
Step 1: Open Cloud Shell
-
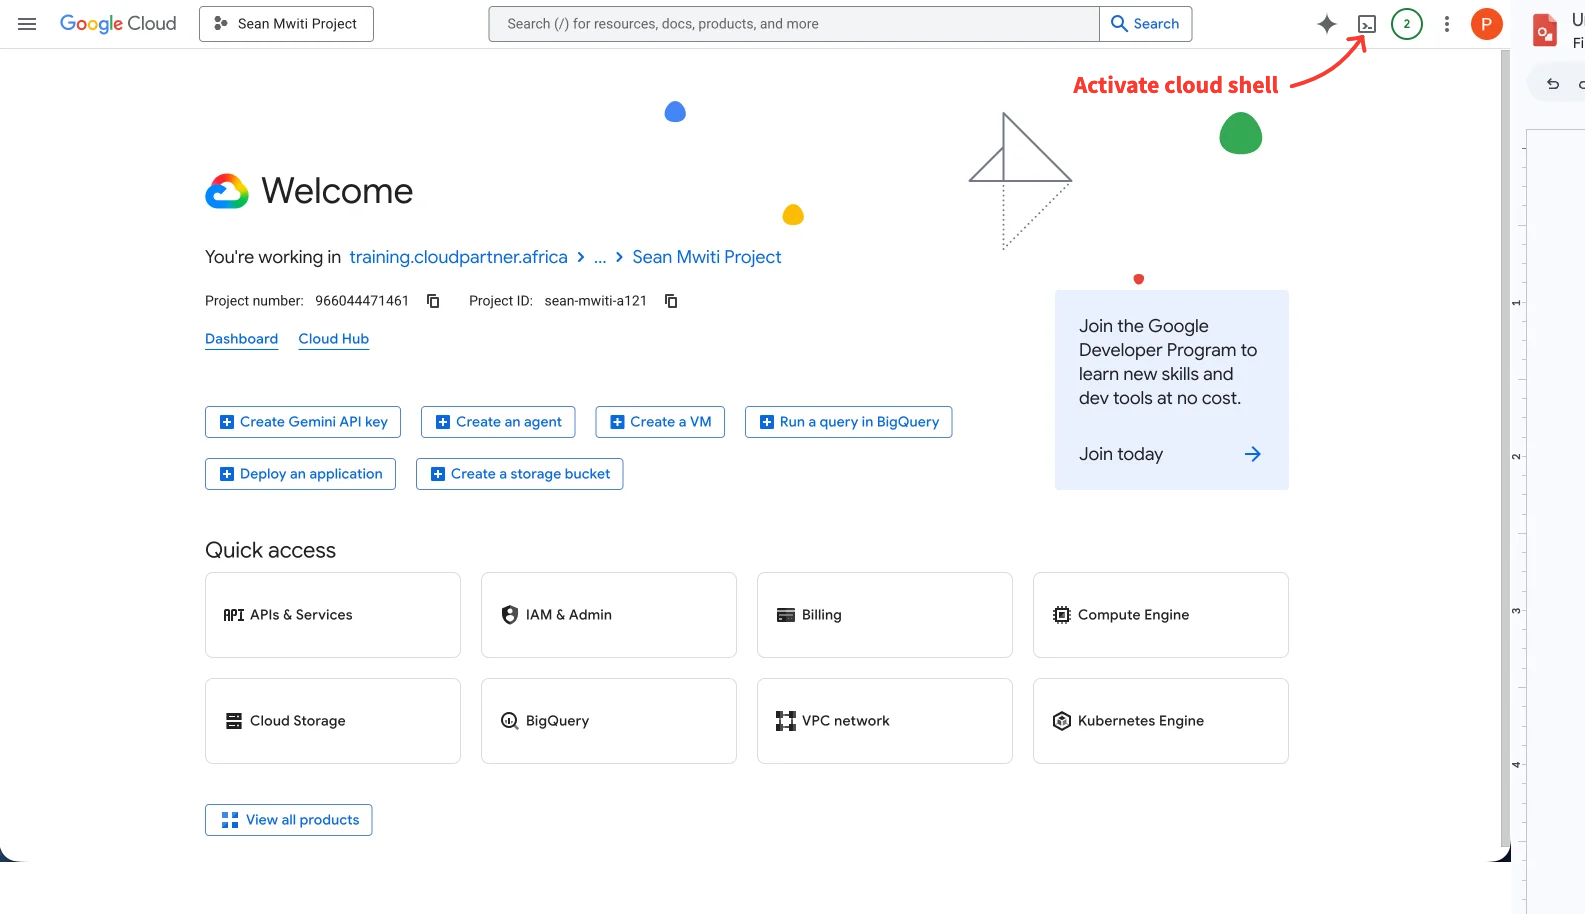
In the GCP Console, click the Activate Cloud Shell icon in the top-right toolbar.
-
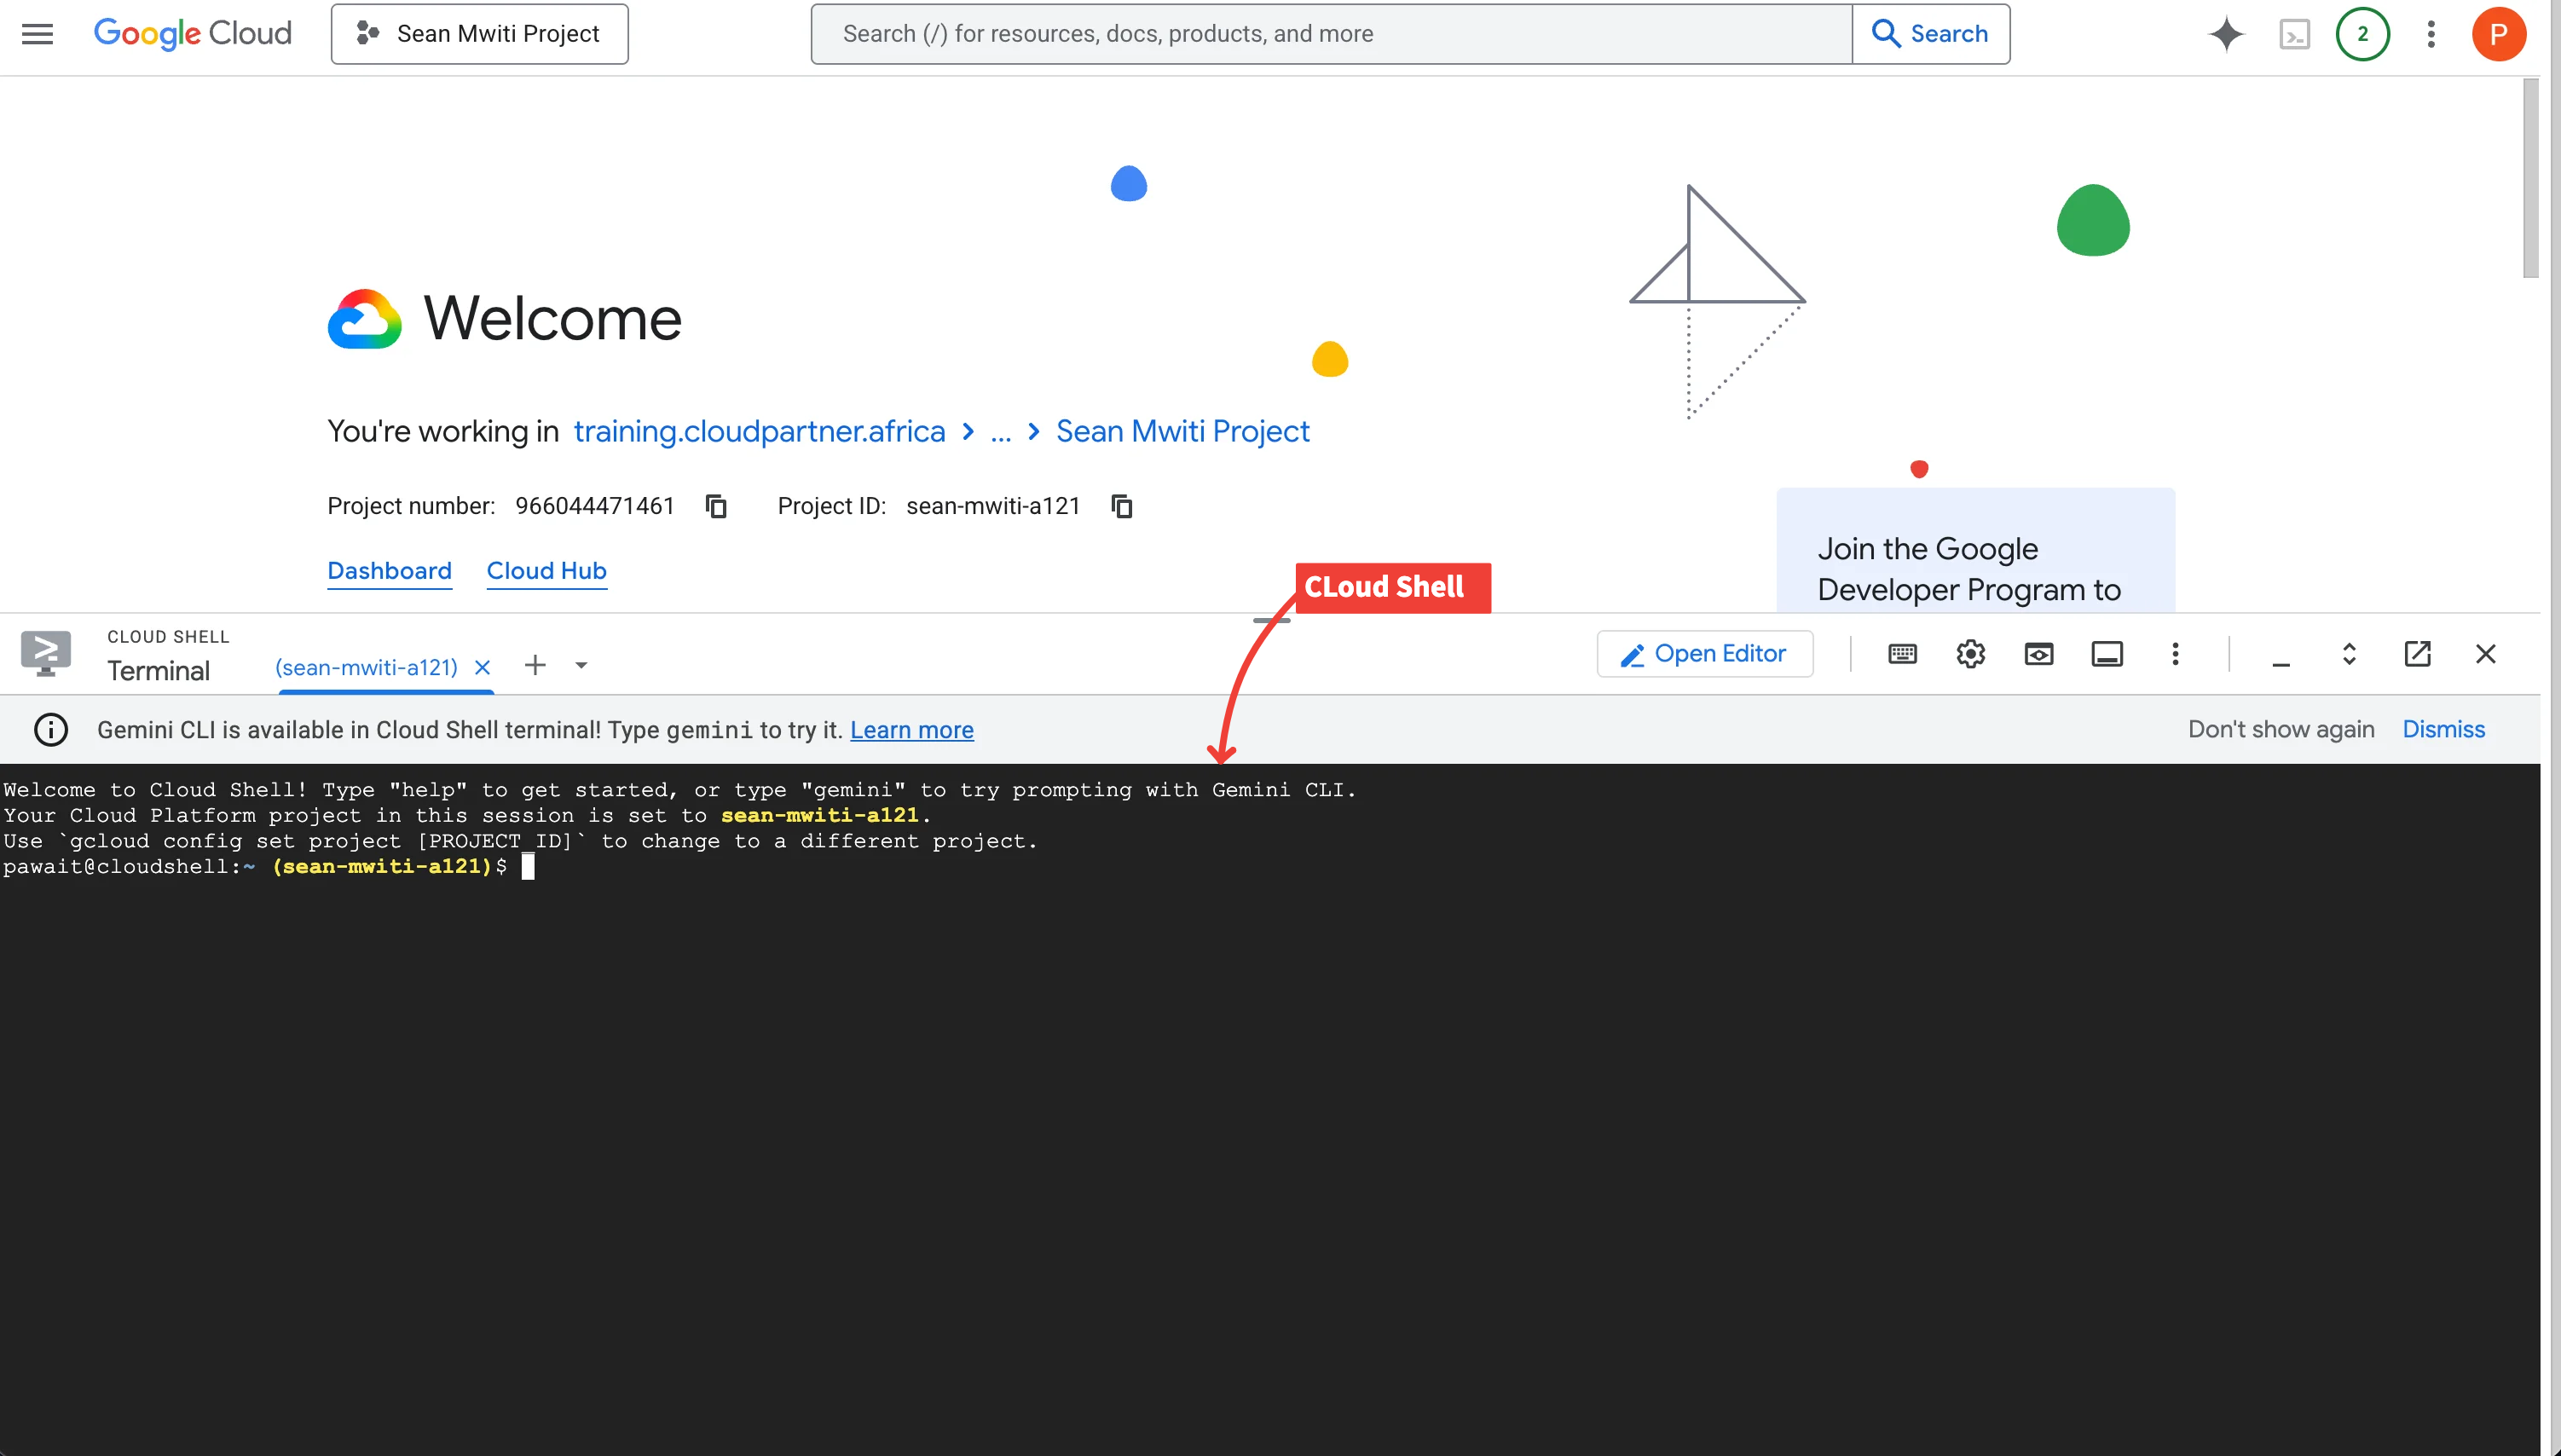
Click Authorize on the pop-up screen if prompted.
Step 2: Set Environment Variables
Step 3: Create the Workload Identity Pool
A Pool is a container for your external identity providers.
Step 4: Create the OIDC Provider
This command tells Google Cloud to trust GitHub's identity tokens.
Action Required
Replace 'Pawa-IT-Solutions' in the --attribute-condition flag below with your own GitHub username.
gcloud iam workload-identity-pools providers create-oidc "github-provider-v1" \
    --project="$PROJECT_ID" \
    --location="global" \
    --workload-identity-pool="github-pool-v1" \
    --display-name="GitHub Provider V1" \
    --issuer-uri="https://token.actions.githubusercontent.com" \
    --attribute-mapping="google.subject=assertion.sub,attribute.repository=assertion.repository,attribute.actor=assertion.actor" \
    --attribute-condition="assertion.repository_owner == '[YOUR_GITHUB_USERNAME]'"
gcloud iam workload-identity-pools providers create-oidc "github-provider-v1" --project="%PROJECT_ID%" --location="global" --workload-identity-pool="github-pool-v1" --display-name="GitHub Provider V1" --issuer-uri="https://token.actions.githubusercontent.com" --attribute-mapping="google.subject=assertion.sub,attribute.repository=assertion.repository,attribute.actor=assertion.actor" --attribute-condition="assertion.repository_owner == '[YOUR_GITHUB_USERNAME]'"
Step 5: Run the Setup Script
The repository includes a helper script (setup-github-wif.sh / setup-github-wif.bat) that enables the required GCP APIs and configures IAM permissions for the github-deploy-sa service account.
Running from your local machine (Linux/macOS)
-
Open
setup-github-wif.shin your IDE and edit theGITHUB_OWNERvariable to match your GitHub username.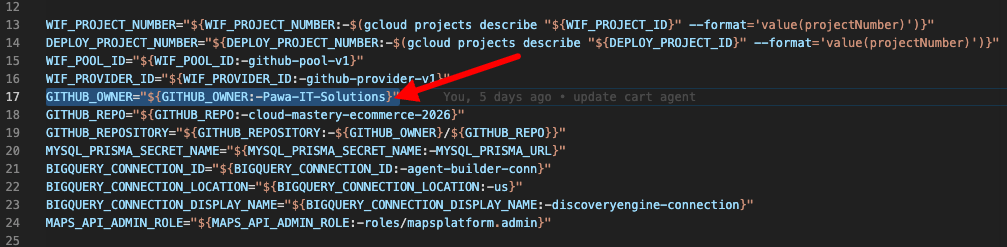
-
Log in with the email you were given, then make the script executable and run it:

Step 6: Bind GitHub to the Workload Identity Pool
This allows GitHub to establish a connection with your GCP project.
gcloud iam service-accounts add-iam-policy-binding \
    "github-deploy-sa@$PROJECT_ID.iam.gserviceaccount.com" \
    --project="$PROJECT_ID" \
    --role="roles/iam.serviceAccountTokenCreator" \
    --member="principalSet://iam.googleapis.com/projects/$PROJECT_NUMBER/locations/global/workloadIdentityPools/github-pool-v1/attribute.repository/$GITHUB_REPO"
gcloud iam service-accounts add-iam-policy-binding "github-deploy-sa@%PROJECT_ID%.iam.gserviceaccount.com" --project="%PROJECT_ID%" --role="roles/iam.serviceAccountTokenCreator" --member="principalSet://iam.googleapis.com/projects/%PROJECT_NUMBER%/locations/global/workloadIdentityPools/github-pool-v1/attribute.repository/%GITHUB_REPO%"
Running from Windows
-
Open
setup-github-wif.batin your IDE and update theGITHUB_OWNERvariable.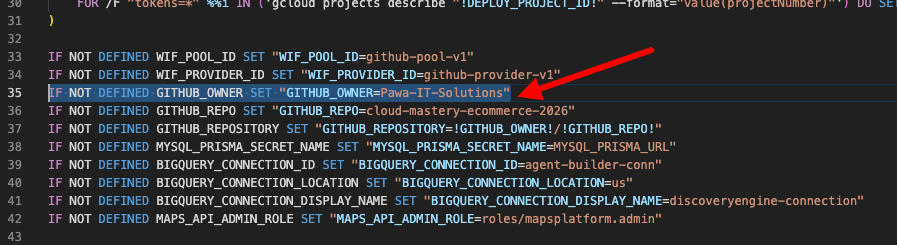
-
Run:
Running from Cloud Shell
-
Upload
setup-github-wif.shto Cloud Shell using the Upload file button.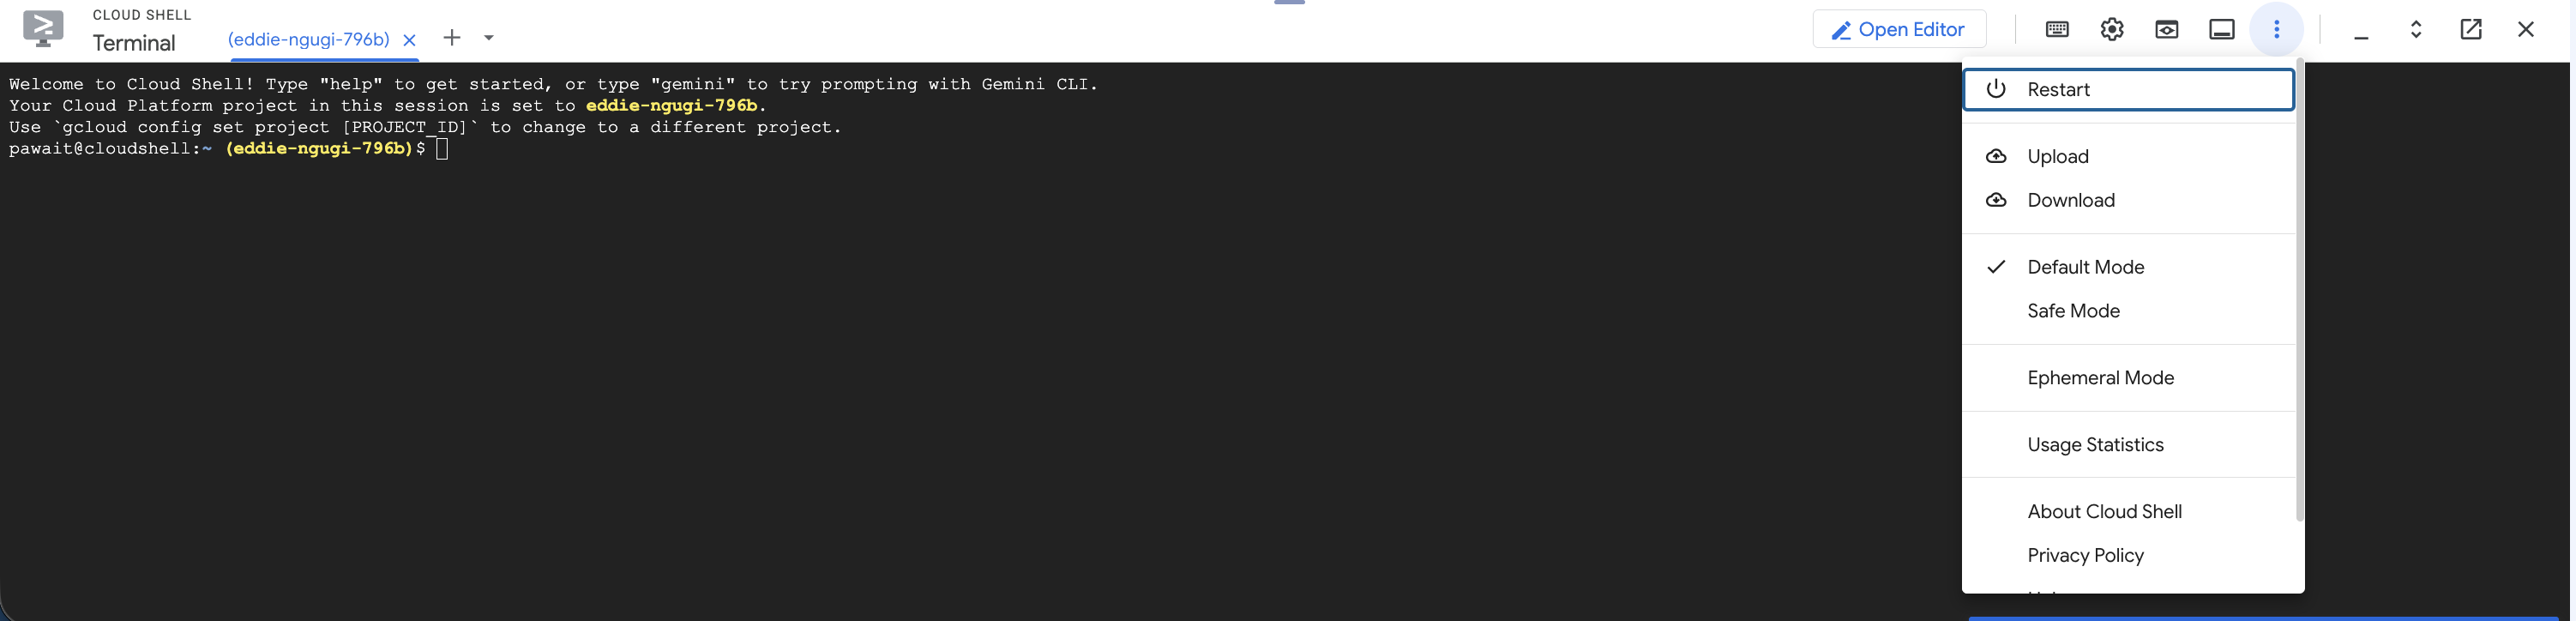
-
Make it executable and run it:
Note
This might take around 5-10 mins to run successfully.
Expected Output
After a successful run you will see:
GCP_WORKLOAD_IDENTITY_PROVIDER: projects/[PROJECT_NUMBER]/locations/global/workloadIdentityPools/github-pool-v1/providers/github-provider-v1
GCP_DEPLOYER_SERVICE_ACCOUNT_EMAIL: github-deploy-sa@[PROJECT_ID].iam.gserviceaccount.com
Copy both values — you will use them in the next step.
Step 7: Confirm the Service Account
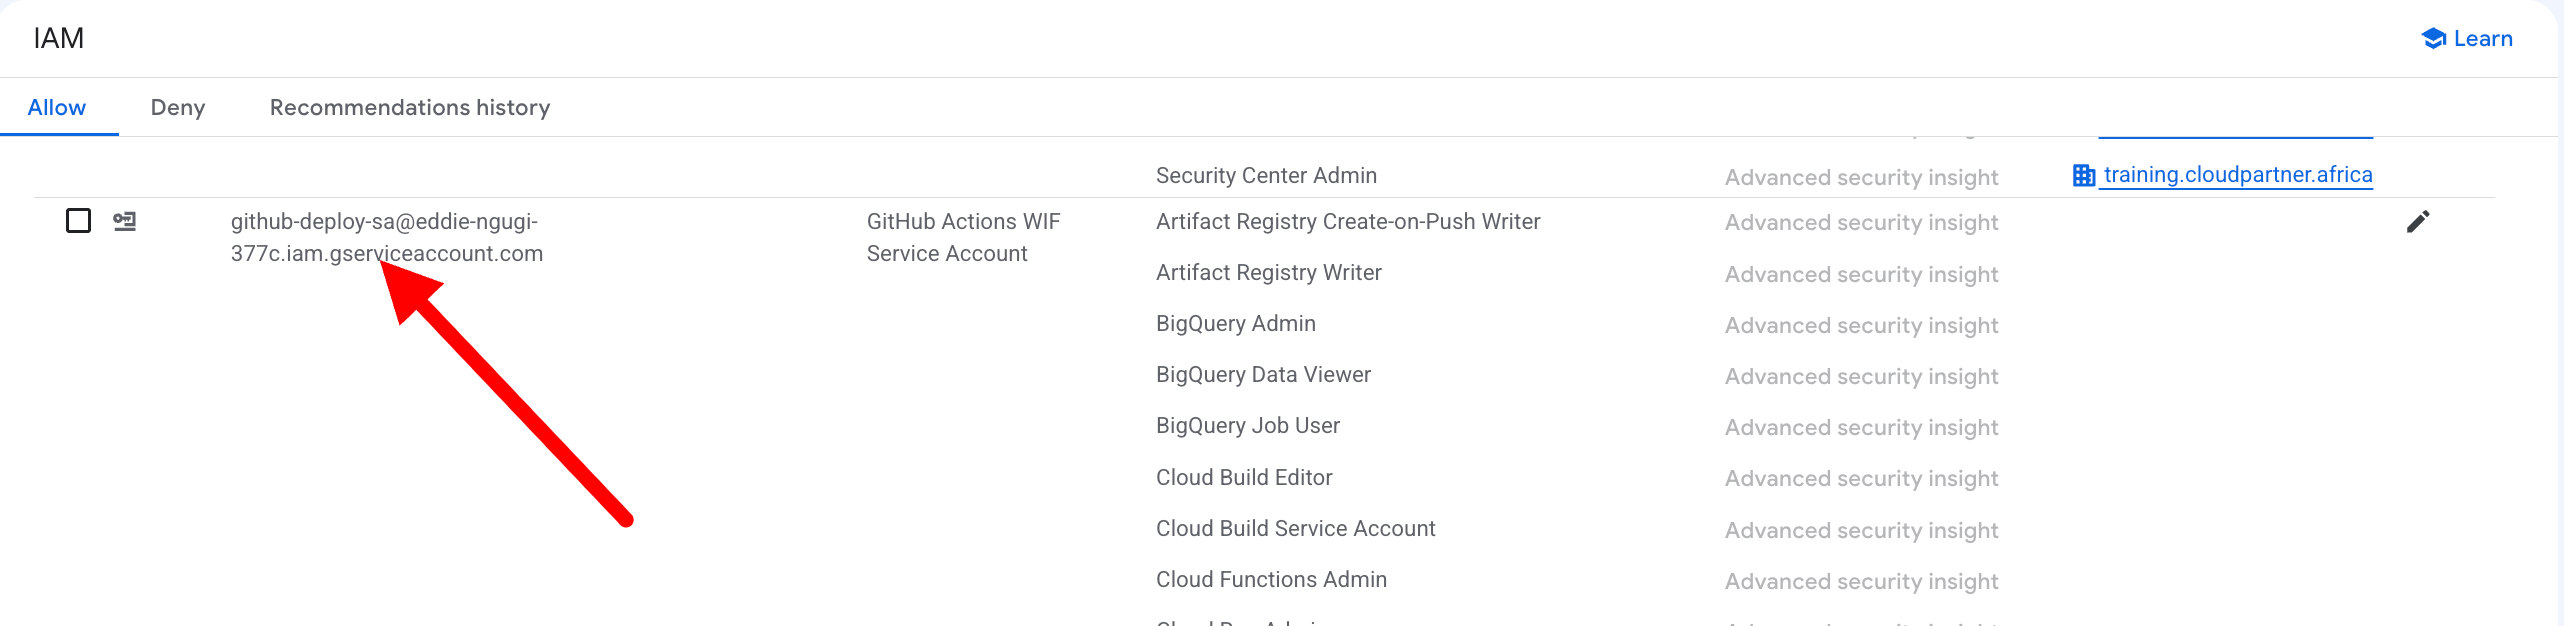
In the GCP Console go to IAM & Admin → Service Accounts and confirm github-deploy-sa was created. Copy its email address.
Step 8: Configure GitHub Actions Secrets
GitHub Actions secrets let the pipeline access sensitive configuration without exposing values in source code.
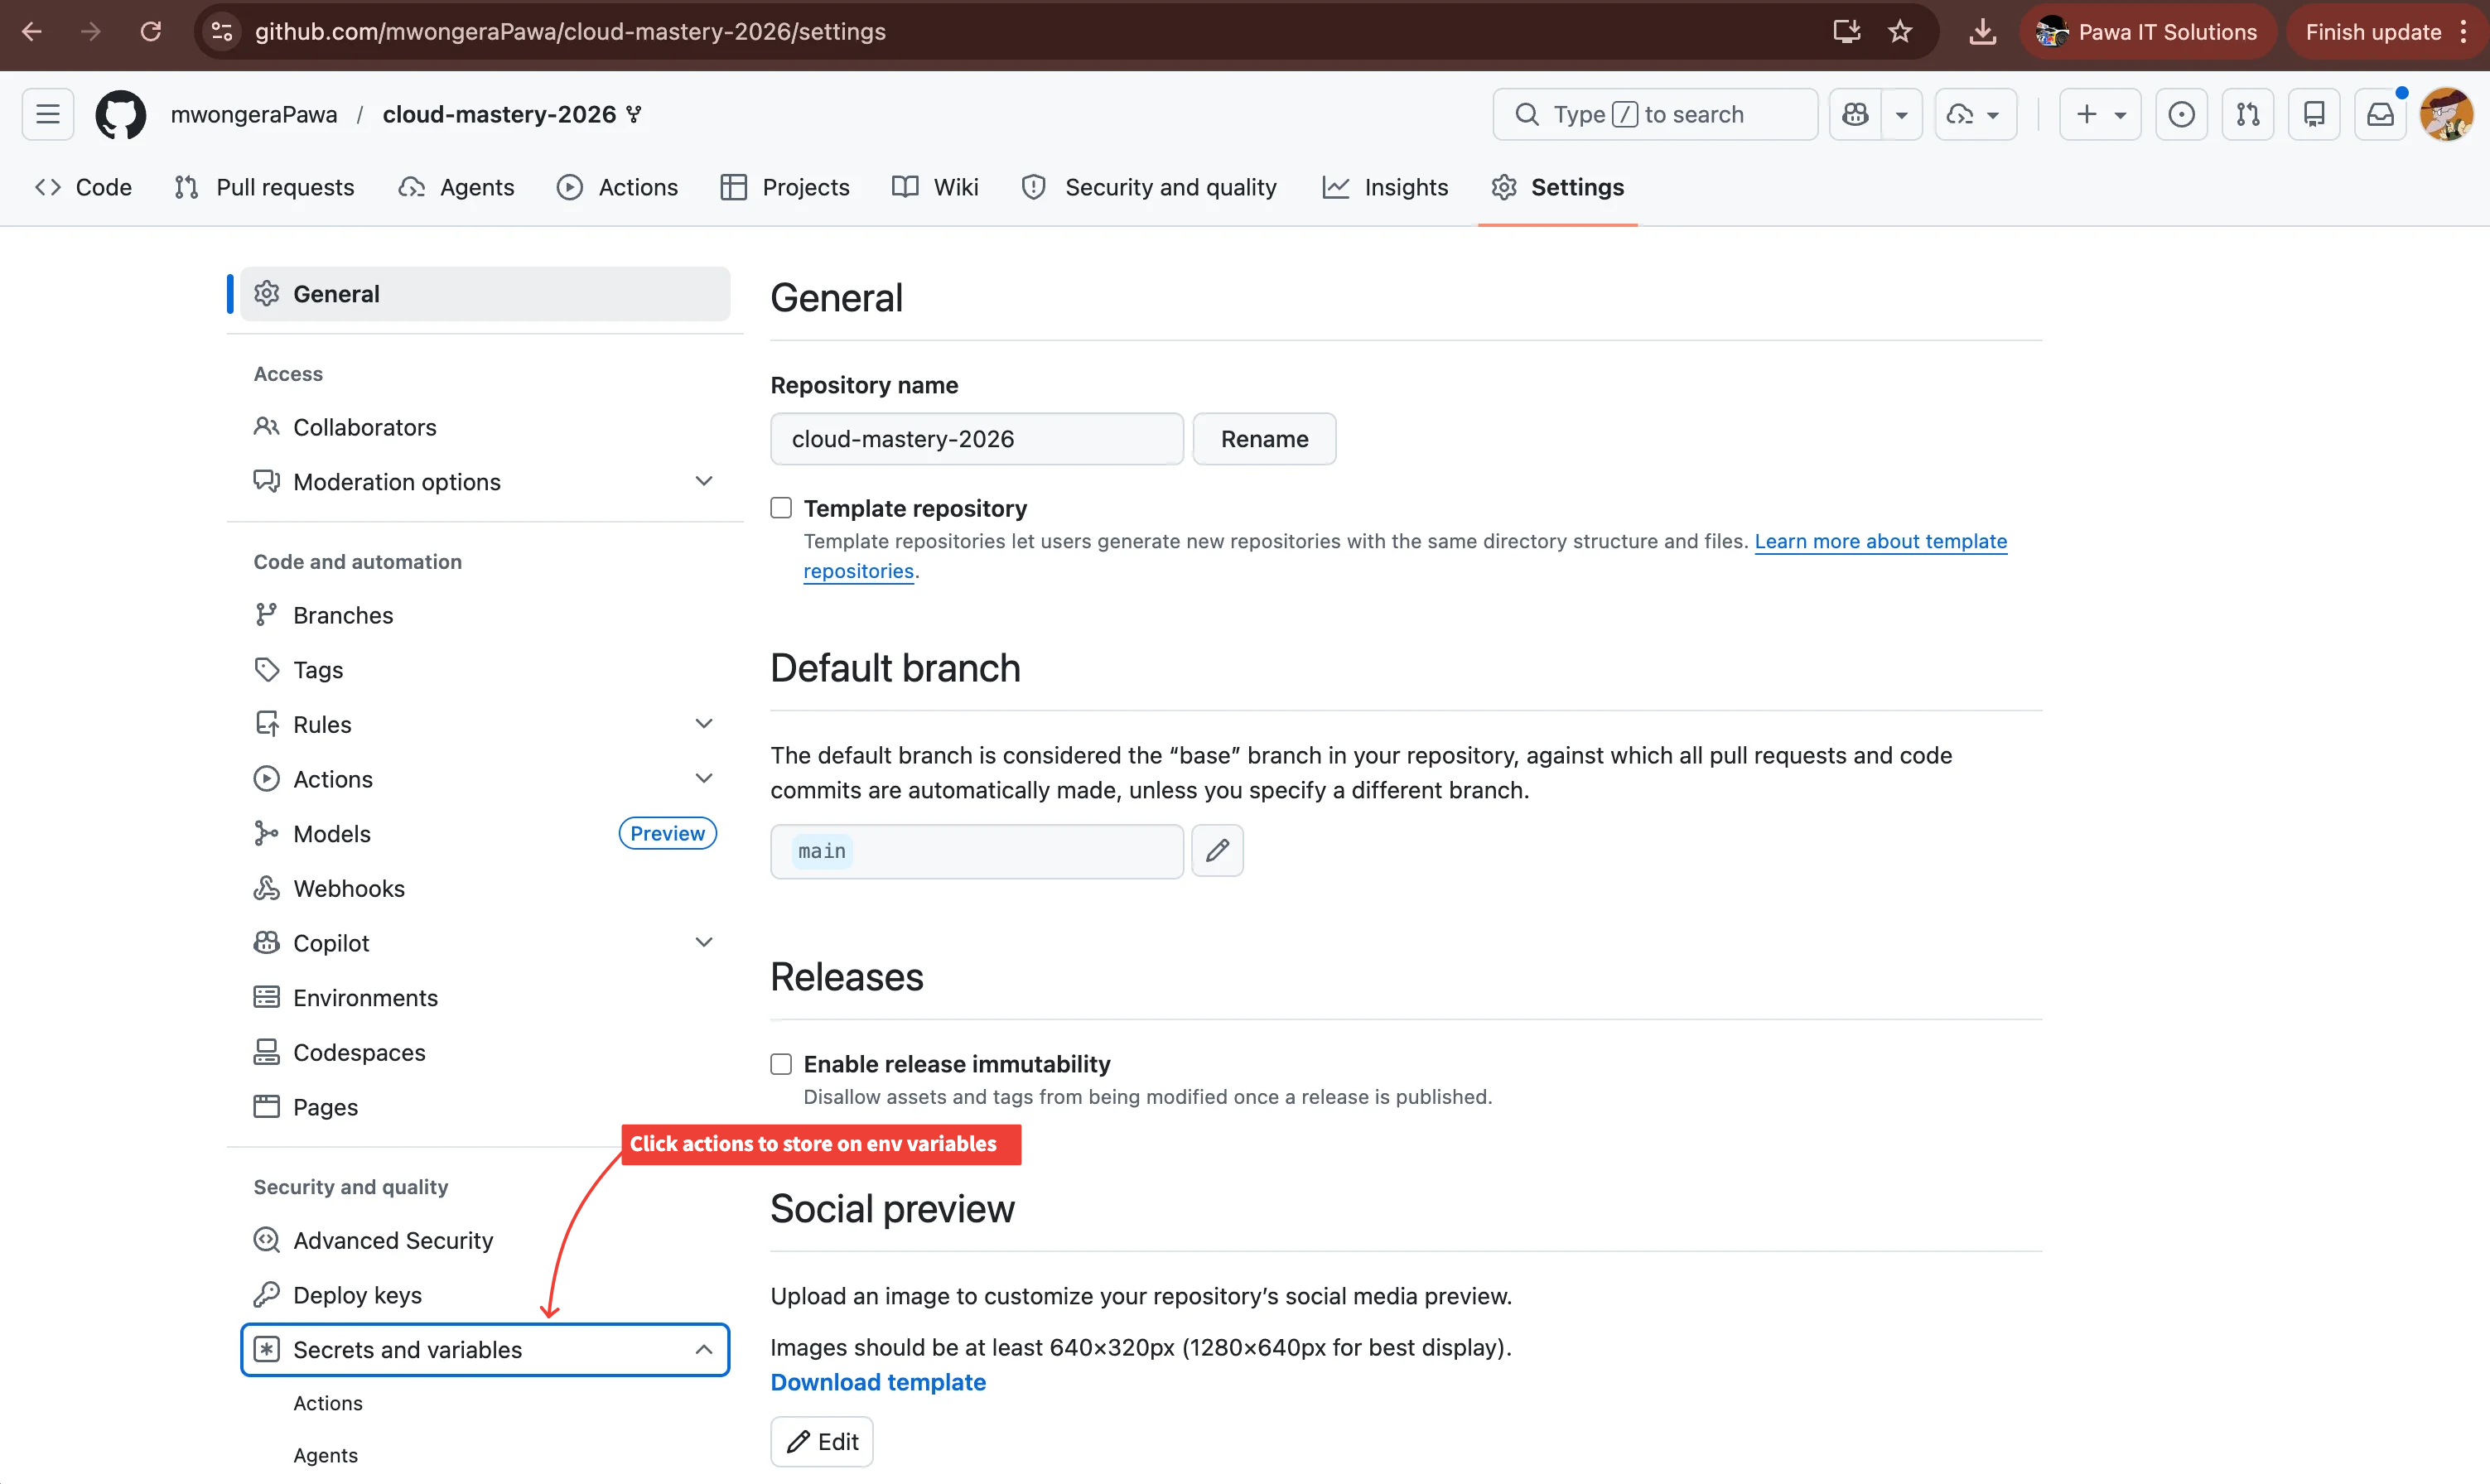
- In your forked repository on GitHub, click the Settings tab.
-
In the left navigation click Secrets and variables → Actions.
-
Click New repository secret and add each secret below:
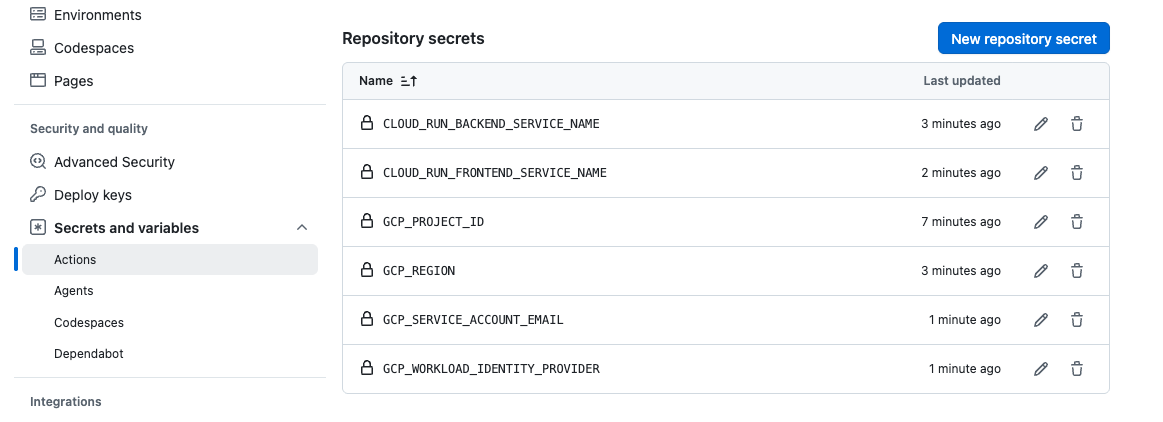
Secret Name Value GCP_PROJECT_IDYour GCP project ID GCP_REGIONus-central1GCP_WORKLOAD_IDENTITY_PROVIDERprojects/[PROJECT_NUMBER]/locations/global/workloadIdentityPools/github-pool-v1/providers/github-provider-v1GCP_DEPLOYER_SERVICE_ACCOUNT_EMAILgithub-deploy-sa@[PROJECT_ID].iam.gserviceaccount.comCLOUD_RUN_BACKEND_SERVICE_NAMEsoko-backendCLOUD_RUN_FRONTEND_SERVICE_NAMEsoko-frontendCLOUDSQL_INSTANCE_CONNECTION_NAMECopied from the Cloud SQL step DB_NAMEcloud_mastery_sampleDB_USERCloud_MasteryDB_PASSWORDMastery_Cloud1MYSQL_PRISMA_URLmysql://Cloud_Mastery:Mastery_Cloud1@localhost:3306/cloud_mastery_sample?socket=/cloudsql/[CLOUDSQL_INSTANCE_CONNECTION_NAME]FRONTEND_NEXT_PUBLIC_CART_API_URLhttps://checkout-service-[PROJECT_NUMBER].us-central1.run.appFRONTEND_NEXT_PUBLIC_CHAT_DEPLOYMENT(provided by trainer) FRONTEND_NEXT_PUBLIC_CHAT_TITLESokoAI AgentPESAPAL_CONSUMER_KEY(provided by trainer) PESAPAL_CONSUMER_SECRET(provided by trainer) PESAPAL_NOTIFICATION_ID(provided by trainer) -
Once all secrets are added your Secrets page should look like this:
Step 9: Verify Secret Manager
The setup script also creates a secret in GCP Secret Manager to store the database URL for Cloud Run.
-
In the GCP Console search for Secret Manager and confirm a secret named
MYSQL_PRISMA_URLwas created.The stored value format is:
What's Next
You have set up a secure, keyless connection between GCP and GitHub and configured all deployment secrets. In the next section you will trigger the pipeline by pushing a commit.